Saturday, June 28, 2008

Reef Maintenance

Just to give you an idea about maintenance, here's a sample To-Do list I made for Saturday morning. It's usually hard to go through these chores without stopping and staring at things happening in the tank, though!

1) remove old Hawaiian feather duster leftover tube.
The thing lost its crown two weeks ago while I was scraping off algae from the acrylic walls. I must have given it a fright. Later on, something gave it a big hicky and then it became a number one food item for Nassarius snails and hermit crabs. The poor polycheate had slithered out of its tube taking its last gasps of...of....oxygenated water when I fished it out. There was something oddly familiar about it; I must have done this a hundred times when I was a toddler on the shores of Okinawa, Japan.
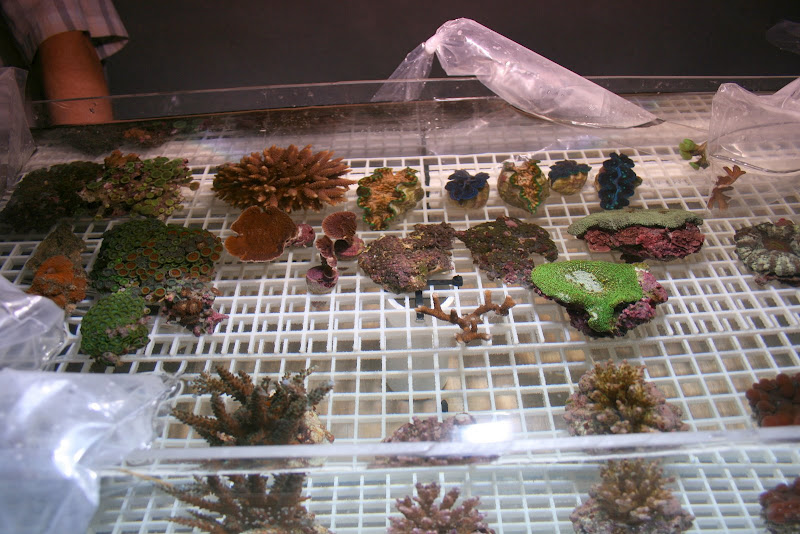
2) Glue down frags.
a) orange Pavona sp.
b) blue-tipped Acropora sp.
c) Red Hot Chili Pepper Monti
d) Bird's Nest
I should glue them down ASAP before hermit crabs, bulky snails or a Tuxedo sea urchin tip them over onto another coral where it will suffer from stings. But, I don't. I dunno why.

3) Remove "Surf-n-Turf" Acro frag and play mad scientist on red bugs.
I took this thing out and did a freshwater dip in diluted sea water. I probably killed it in the process. It was just satisfying killing off the bugs before I killed my coral. I will believe in Neptune if this frag rises from the dead.

4) Find a place for the Kenya Tree frag.
The pistol shrimp purloined the frag to the murky catacombs he engineers underneath the live rock. Maybe it created a stink because it was offered up at another cave entrance several weeks later. Then, it disappeared again. The second appearance called for a prompt, evasive action on my part.

5) Do something about that other Acro that looks like it's suffering from AEFW attack.
Upon further inspection with a magnifying glass, I see no predators and it looks more like random bleaching rather than bite mark patterns which generally are supposed to start from the bottom up. I'll just give more time to acclimate to my tank.

6) Move Orange Turbo snail from refugium to main tank.
He's been eating up too much stationary macro algae. Put him to work in the main tank where he'll be harassed by the fish.

7) Get snails out of the exit area of the refugium.
Periodically, the snails migrate over the dam and go down into the exit area of the refugium which drains into the sump. I have to use a scraper to reach them because my hand doesn't fit there. It's a joy ride for them, I guess.

8) Replace the loc-line on the returns that I removed a few weeks ago.
I'm still thinking about this. I don't think it's necessary to have them there and I like the way it looks. Although, when I turn off the return pump during feeding time, I have seen the Midas Blenny go and stick his body in the return for a bit. I can't imagine what would happen if he decided to go ALL THE WAY DOWN the return and then being forced out when the return pump turns back on.

9) Water Chemistry.
It's that time. Time to measure calcium, alkalinity, pH, salinity and magnesium. Perhaps I'll take a look at nitrates as well?

10) Get 5 gallons of Scripps sea water ready for the water change.

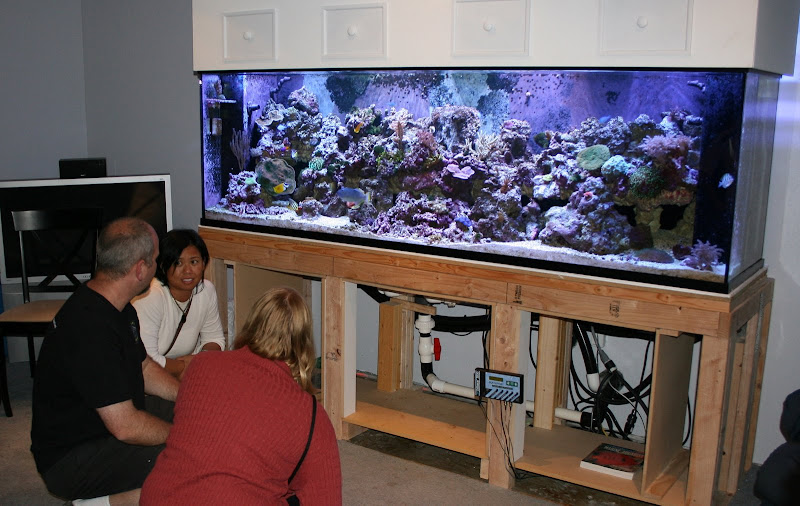
MORE REASONS TO NOT SET UP A REEF IN YOUR HOME
As of 10 PM, #'s 7, 9 and 10 have not been done because I had to pick up a SeaWorld Pass, see the aquariums there, get caught in the throngs of humanity on strollers, see what's at Pet Kingdom because it's close by and engorge a giant tub of Ghiradelli chocolate yoghurt topped with cheese cake yoghurt topped with tart strawberry yoghurt topped with french vanilla yoghurt topped with blueberries and strawberrys with a half-off coupon.

Then, I finished this blog entry. So, the work continues tomorrow!

Idaho Grape Montipora undata Growth

For my two avid blog readers, I've decided to show a short growth sequence of Idaho Grape Montipora undata. I initially received this as a very large frag from an SDMAS member. It had "browned out" and lost its purple color after doing so well, so he had decided to remove large pieces from his tank. I placed a piece in my tank where it continued to suffer under old metal halide and pc lighting and less-than-stellar water conditions. I did see a little growth spurt, then decided to remove it from the main tank. The pieces that migrated to the rocks are what you see recovering in the following pictures.

When I improved water conditions and installed the Aquaillumination LED, it resumed growth. And, it gained back a deep purple colour with dark blue polyps. The last picture shows it "browning out" again during the LED repair time. It should gain back colour when the LEDs come back and if I decide I'm not too chicken to plug it in to the wall socket!

April 24th, 2008


Posted by Picasa

Saturday, June 21, 2008

Aquaillumination Aquatic LED Illumination

This 5' LED fixture was ordered December 27, 2007 from ReefGeek. The LED fixture was manufactured by Aquaillumination. I knew they'd be on back order for a few months, but it finally arrived and was installed on March 5th, 2008. And, meanwhile, my corals had finally had enough of the expired 2X 175W Metal Halide, 2X 96W PC bulbs. Their growth was inhibited and some were visibly retracting from their skeletons. I couldn't even keep a Montipora capricornis happy! It was around this time that I decided to concentrate on the water parameters that I previously blogged about on "Pulsing Xenia: The Rebound Story". With the improved water quality and AI LED in operation, coral response has become 100% better.
Other AI Users?
I've noticed that there does not seem to be much discussion about these units on the internet, so I've decided to contribute to the blogosphere by recording my experiences here. One other blogger that I know of can be found here. Maybe I'll impart some vital information to one of the 100's of users out there? As it turns out, I do have one vital piece of information found below. Unfortunately, (okay, the real reason why I'm blogging on this subject) I've got another, new major problem which might just be specific for my device.
VITAL INFORMATION #1
Check the fan units and make sure that they are all working when you have the LED's at high output. Don't assume that the controller will be able to notify you of this type of malfunction.
Fan Trouble Discovered
Toward the end of April, I decided to use my hand to feel the heat being blown away by the 5 pairs of variable speed fans on top of the unit during peak lighting output. I noticed the central pair was not operating at all. I was disappointed to find that the controller was not indicating anything unusual about overheating or fan malfunctioning because the heat sink was really hot. Maybe there wasn't enough overheating to trigger a "CHECK FANS" or "OVERHEATED! See Manual" trouble code as indicated in the online AI Manual? Or maybe the heat sink was doing a good enough job dissipating heat with the help of the neighboring, working fans? Regardless, I contacted AI tech support. They promptly sent out a pair of replacement fans after I was able to show that the problem followed the fans when I swapped positions on the unit with a known working pair.
Fan Replacement
At first, it was hard to figure out how to unhinge the plastic protector from the fans and have it snap back in without feeling like you might break something during the process. The pieces were flexible and strong and I soon became an expert AI technician. I had to power down the entire unit before removing and adding a fan pair. Then, I had to wait until the unit provided enough excess heat to trigger fan operation. The replacement fans still did not work. Another pair was sent to me. I must note here that I could visibly see that the replacement fans' wiring was a lower gauge than the originally installed fans.
Electrician Neighborhood Pal (ENP)
In the meantime, I took the fans to my ENP. With his fancy equipment he was able to determine that the diodes in the leads were installed in an opposite configuration. In other words, all I had to do was plug the fans' red/black leads in the polar opposite direction and they would work. And, because of the design, the fans would still rotate in the proper direction. While we were working with the replacement fans, the wiring on one lead came apart. My ENP seems to think that the soldering wasn't applied correctly.
Fan Summary
My ENP also opined that there could have been a batch of these fans that might have been installed in the production line of these devices. While I have no clue on how the intricacies of the AI production line works, I would still like to bring this issue up for other AI users to investigate. I'm currently on ReefGeek's and AI's mailing list and, besides the usual coupon code announcements, I have not received any other notifications. In addition to Googling, I've also perused the ReefCentral Sponsor Forums where ReefGeek, but not AI, maintains a presence.
The Next BIG Problem
(Why Me on a Friday Night?!)
Yesterday, the power went out on one of my home's circuits. This is basically what happened because no other electronic equipment suffered from any unusual power surge. Nor did the neighborhood complain of anything unusual concerning our electricity. In fact, my ENP happens to keep records of this sort of activity! His report: nothing unusual during that time. Also, our neighborhood power lines are located underground away from lighting strikes.

When the AI LED's were powered back on, they went into a constant flickering mode. After having them powered off and powered back on, they continually cycled into a complete shut down mode. While at work, I sent an e-mail out to AI tech support and by the time I got home, they called me. We were able to troubleshoot and at least get the unit down to 0% White and 50% Blue, but the unit continued to completely shut down. At this point, it seems like the power adapters may not be at fault.

AI tech support decided to send out a replacement circuit board which will arrive on Tuesday. My ENP has volunteered to join me on that occasion. So, my reef tank is headed for 4 days of darkness. My fish are in a perpetual state of being in their Pajamas. I've read about people using several days of darkness to combat algae problems in their tanks with no ill effects on their coral. We shall see.

....UNTIL THEN: SAVE MY REEF!!!

Posted by Picasa

Friday, June 20, 2008

Living with Transmitted Diseases (in a reef tank)

If you've been choosing Abstinence to avoid sexually transmitted diseases in your life, reef keeping is not for you. You may have already read about the three SPS terror “bugs” before you even glue down one SPS in your pristinely kept saltwater tank. In fact, you probably know them by heart: 1) Montipora-eating Nudibranchs, 2) Acropora-eating Flatworms (AEFW) and, 3) Acropora “red bugs”. Of these, I’ve read that AEFW is absolutely the worst one you can get.

Dirty Little Bugs

I thought, “Those dirty little 'bugs' won't end up in my tank; I'm not as popular as a high school cheerleader”. But, there they were on my first prized possession: Montipora-eating Nudibranchs on my Rainbow Montipora from Reef-a-Palooza 2007. I submitted it up for discussion on SDReefs before I removed one and was able to snap a picture of it under a microscope. It was easy enough by loosening it with a pipet and sucking it up to be poured down the toilet. The lesson to be learned: don't trust big events like Reef-a-Palooza or cheap hotels in Phoenix, or any party with the word "White".

My First Reef Tank STD

Sad Reformed Hussy

But, like a sad reformed hussy, I brought home a nice chunky frag of "Purple Haze" Montipora along with some other SPS frags. Upon initial inspection, I noticed what looked to be some sort of egg sacs on its underside. At first thought, I guessed they were probably snail eggs and would be quite harmless. Then, on second thought, I decided to brush them off with a toothbrush and not take any chances. I already had egg laying snails in my tank and didn't really need any more. Then, I placed the frag in my refugium so that I could closely monitor its activity before I decided on a spot in my main tank. For a few days, it looked "normal" with its polyps extending and nice coloration. Then, as time passed, the polyps stayed retracted and the color began to fade.

Success!

Then, one day, I actually found an adult Nudibranch slithering up the walls of the refugium tank. As part of my denial, I guessed that it was a Berghia Nudibranch which is known to only have Aiptasia on the menu. So, I used a pipet to drop it on a nearby Aiptasia where it was promptly guided into the anemone's oral disc for digestion. Woops! I didn't know you were supposed to introduce them to the base of the anemone! After monitoring for several weeks and sucking out any Nudibranchs I found, the Montipora regained its color and polyps extended once again. I placed the frag in my main tank where it continues to grow in the absence of those pesky “bugs”.


"Joe's Got Crabs"

Lately, I've had to admit to myself (yes, the first step is...) that “I've got crabs”. Why didn’t I learn my lesson about STDs? Where one is present, there are probably others that hitch along for the ride. Only, this time, it's not as easy as extracting Nudibranchs or shaving a few strategic locations and applying 1% Permethrin lotion. This time, the recommended treatment involves nuking the entire tank with “Interceptor” (Milbemycin oxime) where it will interfere with chitin exoskeletons of arthropods like “red bugs” and isopods as well as my hermit crabs, skunk shrimp, coral-banded shrimp and my Goby’s pistol shrimp. If I were to remove all 300 lbs. of my live rock, I might have a good chance to collect them all to be placed in my quarantine tank.

Ugh……UGH…Noooooowwaaaahhh!

Or, I could try a natural predator of which only one is known at time: the Dragonface Pipefish (Corythoichthys haematopterus). My pygmy angels like the idea of a few new toys to play with. I would hope they would at least let the Pipefish work a wonder before they play hide-and-seek.

Depression

I’ve survived the 90’s drunk as a skunk (but, not on Tuesday nights) and had my share of …..okay, that belongs in an anonymous blog. Now, I have to learn how to keep my tank in pristine condition by quarantining corals and doing prophylactic dips in iodine and Interceptor.

Life...

Have I learned my lesson? Yes…..and maybe not yet: I seem to be traveling in the footsteps of the SPS growers before me. An AEFW attack seems to be the next predictable step. Also, I can’t say “NO” to anyone who offers me a beautiful SPS for a few $$ even if they may have been the source of my infection. It sounds similar to true life (minus the exchange in cash, of course!), aye? Even the most careful of collectors end up having to do the treatment at some point.

...goes on.

Still, life is worth living and I do love those corals when they fluoresce at night!

*And, plus: you can barely see the little "red bugs" which really are light orange!


Posted by Picasa

Saturday, June 14, 2008

June Reef Societies Meeting

I went to a June meeting last night in Lemon Grove. Members of NCRMAS, SBRS and SDMAS were present. There was plenty of food and drink. About 40 people showed up.

This is a new and ongoing installation of a 300 gallon tank which uses Scripps Pier sea water. Dave has been using NSW successfully for about 10 years in his tanks. WetWebMedia suggests that you should use NSW with caution. All corals, macro algae, coralline algae and fish are in mint condition as far as I can tell. I find this display tank very encouraging as I've also chosen to use Scripps NSW in my tank.
A guy from Reef Nutrition gave a very detailed lecture about their micro food products for the reef tank.

Decisions, decisions.....drool wiping....Direct Marine Imports & Snyder Perkins Seas frags in the back of a pickup truck. They donated about 6 frags to the raffle.
Members' frag tank. One member donated a Rainbow Montipora to the raffle.

The guys from Reef Empire brought an impressive batch of frags to sell. They donated some frags to the raffle as well.

In the upper right-hand corner of this mini frag tank close-up is a frag that caught my eye. I'm still waiting for those Lord Acan prices to fall! Now that I can look at these frags under the scrutiny of the camera's eye, I'm regretting not purchasing more at this event!

Here's the frag acclimating in my possession. It's a Pavona sp. The polyps seem to have this shiny copper effect with the lights. And, at night, the frag has an orange fluorescent glow under the blue moonlights.

I purchased some raffle tickets and noticed that about 3 raffle tickets AFTER my raffle tickets were called out as winners. One of my tickets was called out, but it was the last one. And, at that time, it was just a free-for-all, grab-bag sorta thing. Mayhem ensued. I'll be sure to purchase more tickets at the next event to increase my odds of winning!

VorTech Driver Installation

The garage is full of wonderful things that you just know you can't discard because, at some point in the future, they will come in handy. Case in point: this old solid brass Ornamental Hinge Kit purchased long ago for $1.2X before we entered another economical recession (as opposed to another hair line recession). The brass screws were perfectly matched for mounting the VorTech driver box to the underside of the aquarium's wood frame.

Voilà-ici is the Slave driver.


Et, voilà-ici is the Master driver.


So simple, yet it took me about two hours to de-wire the area (it's worse than a modern desktop PC down there) before I could screw them in.
Posted by Picasa

Monday, June 9, 2008

New Frags: Chili Pepper Montipora, Bird's Nest & Blue-tipped Acropora

I read a post once from someone who had moved away from San Diego saying how much he missed the community and how much we're spoiled by all the available corals in the area. So, when I saw a post in SDMAS about corals for sale, I made sure to take advantage of the situation.

I missed the initial post yesterday, but it turned out that they were still available. They were only 6 miles away from me!

Here they are in separate containers being equilibrated with my tank's sea water.


Acclimating New Frags
I checked the temperature with a digital thermometer and they matched my tank, so I didn't have to worry about equilibrating temperature. I removed about half the sea water and added three turkey baster volumes of my tank's sea water to each container. After 5 minutes, I repeated the addition. I did this a few more times and emptied the container when it got too full. I usually have a beer to keep me from speeding things up.

Then, I placed the new corals at the bottom of the tank so that they could adapt to the new light intensity at a lower level. I'll eventually glue them up on the live rock. Click on the pics below for more detail.


Posted by Picasa

Vortech Gen2 Magnet Upgrade Kit

Upgrade Kit and old pump


True to their word, EcoTech Marine sent me the replacement/upgrade kit for the original Vortech MP40 pump that I purchased last year. If you look closely at the screw head on the right, you can see a deep corrosion hole forming at 11 o'clock.

The black donut on the lower left of this pic is the new magnet which is coated in a resin to protect it from the corrosive action that salt water is known to have on metals.

The design and power of this pump is still worth recommending. The company has responded quickly and has made the upgrade kits available for a low price.

EcoTech Marine discussion is here at Reef Central.
Posted by Picasa

Sunday, June 8, 2008

A is for Arthropoda

Here's something I found buzzing in the backyard. It looks like it might be feasting on an adult aphid or leaf hopper. Either way, it's nice to have these type of predators at work. It looks like a cross between a fly and a mosquito. Is it a midge? But, after scanning google, I came up with an image of a "robber fly" that matches.
Posted by Picasa

Saturday, June 7, 2008

Pulsing Xenia: The Rebound Story

Pulsing Xenia As Found At The Pet Store

My attraction to Pulsing (or Pom-pom) Xenia had to do with the active polyps. When you see them at the pet store pulsing away individually, you can see how they might educate and remind someone that corals are indeed part of the Animal Kingdom (duh!). This blog entry is the story of how my Xenia lingered in my tank and then regained its activity after paying closer attention to water parameters.

I purchased some green Zoanthids which happened to have pulsing Xenia on the same rock (Pet Kingdom). So I received two types of coral for the price of one Zoanthid colony!

As with most corals, they may change appearance or growth as they acclimate to conditions you've set in your tank. The water, lighting, temperature and additive parameters will most likely not match that at the pet store. At the early stages of my reef keeping (March 1st, 2007), I had a 65-gallon Uniquarium with PC lighting.

On July 4th, 2007, I upgraded to a bigger tank. Slowly, I added back several corals and switched from artificial to natural sea water (NSW) available at the Scripps Pier in La Jolla.

As time progressed, I noticed that some corals grew fine while others were not-so-fine. The Xenia seemed to be struggling and I read online about how they would just melt away in some tanks. Mine wasn't melting away; it was hanging on. It actually progressed slowly up the live rock where it split into two colonies and sat like a lump most of the time. I was just waiting for it to do its disappearing act.

Two Pulsing Xenia Colonies "On The Verge"


The tank parameters that I chose were mainly for keeping fish. But, as I researched further online, I decided to focus on three things:

1) Lighting: I switched over to Aquaillumination LED lighting (Reefgeek.com). The LED lighting was finally installed on March 4th, 2008 after waiting several months.

2) Nitrates: I installed a 20” LifeReef refugium with a 6” Deep Sand Bed (DSB) to aid in providing an amphipod/isopod population as a food source for the fish and for growing algae to absorb nitrates and phosphates (October 31st, 2007). The levels never seemed to fall below 10 to 20 ppm. So, I tried out Seachem de*nitrate and brought down nitrates to undetectable levels (April 13th, 2008). Read about my nitrates here.

3) Calcium, Alkalinity & Magnesium: In my hands, undiluted Scripps NSW consistently measured at 420 ppm Calcium, 8 dKH Alkalinity and 1050 ppm Magnesium. The Calcium and Alkalinity were expected values for NSW, but Magnesium should have measured around 1250 to 1350 ppm. Therefore, I raised the Mg levels every day by 100 ppm with Seachem Reef Advantage Mg until levels were at 1350 ppm (April 28th, 2008).

Pulsing Xenia Responding to New Conditions

Picture taken on April 27th, 2008.


Finally, the Xenia looks just like the specimens found at the pet store. Now that I'm enjoying seeing this specimen in my tank, I've become a little leery about how much further this will progress. I've read that in some conditions, Xenia can grow out of control and become more of a pest. I placed a rock on top of one of the colonies and it moved, over several weeks, to regain optimal light exposure. I can now trade it with other hobbyists!

Pulsing Xenia Like You See In The Pet Store
Posted by Picasa

Friday, June 6, 2008

Calcium Reactor Installation Part IV


This is a simple modification of spare parts from a Maxi-Jet pump. It's the "Tube Router" which has had its bottom buttons clipped off and super glued to the "Adjustable Hook w/Guide". I plan on using this to secure my calcium effluent return tubing to the side of my sump.
Posted by Picasa

Calcium Reactor Installation Part III

You can see the feeder pump in the lower right of this portion of the sump. The relief valve was spraying too much, so I submerged the entire setup. It makes a little flow within the sump with no noise and no bubbles are generated. The extra tubing is looping over the top in case I move the calcium reactor farther away.
In the middle, you can see the bubble counter with a CO2 bubble in it. It was suggested that the bubble count be set to 40 bubbles per minute. I currently have it at 38/min.
This is more detail on the CO2 regulator showing the fine needle valve (Marine Depot) which helps in getting the correct bubble count going. I wasn't worried too much with the black tubing fit as I have the second gauge output to the lowest setting. I could only shoot for less than 25 psi because of the gauge resolution. The recommended pressure is usually 15 psi.

Right between the two main tank return pipes in the sump, you can see the effluent tubing from the calcium reactor. I like it dripping into the return where there's a lot of turbulence for easy mixing. It was suggested that I set this at 35 drops per minute, but I currently have it set to 40/min. It was a PITA trying to get the gate valve to slow down or speed up the rate because of the awkwardness of how I have it set up. I need more tubing to make this easily accessible for fine tuning.

Calcium Reactor Installation Part II

Here's some detail on one of the calcium reactor's cylinders. It contains a yellow plastic strainer plate, a white strainer plate and a fine screen mesh on top.
After rinsing the substrate, I loaded the cylinders. I calculated the total volume of the cylinders to be 1.1 gallons (4.5" diameter and 16" height each). I still needed an extra 2 cups after the washing and settling.
The left cylinder is kept lower with substrate than the right one in order to avoid debris being caught up in the circulation pump. I attached the feeder pump and the lids (eight nuts and bolts holding down an acrylic square with an o-ring underneath) and tested the system with water. Then, I purged the system with Scripps sea water.

Here is the temporary set up. From left to right: CO2 tank, digital timer for counting bubble and drop rates, calcium reactor, auto top-off with designer Scrabble game on top and refugium tank. I have to find some furniture to hide these items!
Posted by Picasa