Friday, May 29, 2009

DIY ATO for the Nano

The DIY ATO (do it yourself auto top-off) project was able to proceed once I received the $6 float switch ordered from eBay. I used a 1/16" drill bit to create holes on the side of the Battery Air Pump. I also drilled holes in an empty tube of AquaMend to house the float switch. The original DIY details for internal wiring can be found at Nano-Reefs.com. The air pump has a built-in clip that will allow me to mount it onto the AquaClear refugium located behind the Nano tank. I just had to shave it off a bit to avoid salt creep.


The 2.84 L container is rigid enough to allow pressure build up from the air pump in order to drive water up and out. The next step will be to figure out how to mount the float switch in the Nano tank.
Posted by Picasa

Red Hot Chilli Pepper Montipora

I tried snapping another macro photo of my pet RHCP Montipora coral. I'm still not too satisfied after the 50th attempt, so I guess I have to try 50 more attempts to get that one perfect photo.

I noticed that the polyps each have 6 tentacles. I've seen other photos where Montipora polyps contain 2X that number. I wonder what this implies as far as classification is concerned? With another coral, I recently learned that Goniopora have 2X more tentacles surrounding the mouth than Alveopora. Both are known as "flower pot" corals, though. I still haven't figured out the difference between Montipora foliosa and M. capricornis.

Posted by Picasa

Thursday, May 21, 2009

Aquascaping the Nano

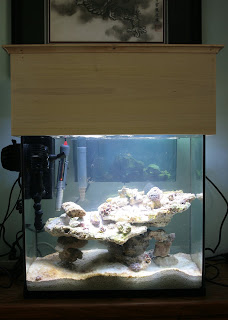
I had to lower the live rock platform from the top because it was exposed during a 5 gallon water change. Even though I added an AquaClear 110 on the back as a Sump/Refugium, I still had to drain some water from the Nano during a water change. So, in addition to lowering the top rock, the heater replaced with a lower wattage and Vortech moved to the left.

I'm thinking about adding another small rock to raise the top platform to separate it from the lower platform. This should make it a little more interesting. I just want to let the tank rest after the reconfiguration. With the platform lowered, there should be more room for future corals to grow to the top as well. The AC110 Sump/Refugium behind the tank is seen lit with a Coralife Mini PC.

I also added simple crown molding to the top of the canopy. Unfortunately, I selected finishing nails that were a bit too thick and really banged things up! Maybe I can use the overhanging nails to hang xmas lights during the holidays?

Posted by Picasa

Sunday, May 17, 2009

Nano Tank Canopy

I went to Home Depot and bought all the wood necessary for the Nano Tank Canopy.

The design fit snug on top of the Nano tank. I didn't find any fancy crown molding to apply to the top, but I'll add some simple molding later. After that, I'll paint it black with some spray paint. I had an old Vortech pump that didn't power up for a few hours even though the adapter was powered up. I'm testing it out here on the lowest power setting. I'll have to rearrange things again after I decide what to do with the aquascaping.


Here's the AI LED unit resting in between two wood planks. The unit sinks 2 mm between the two pieces and cannot slide front to back.

Posted by Picasa

Monday, May 11, 2009

Nano Canopy Design

Using Google's SketchUp program, I put together a canopy design for my 15 gallon AGA Nano Reef with the new 12" AI LED. I just wanted to have an open top design to hold the unit in place while allowing me to decide on where I would position the AI LED left to right. The open top allows the best air circulation for the AI LED's fans which are located on top.


I'm not sure how much more I'd like to hide the AI LED unit within the canopy. But, I do want the AI LED to stay about 5" from the top of the aquarium. This gives me a better spread of light.

The Google SketchUp data file is shared here.

Posted by Picasa