Showing posts with label Aquasculpture. Show all posts

Saturday, February 18, 2012

Aquasculpture of 50 gallon Reef Tank & Radion XR30w Installation

The Radion LED light fixture was installed over the 50 gallon tank. I used 1/4" Molly toggle bolts to install the custom hanging kit to the ceiling. I had to make over-sized, messy holes (I should have read the link and used the nylon toggle anchors, instead) in the ceiling and will have to putty and re-paint it, but the aquarium kinda takes away from you ever noticing the holes above.
I installed the software and programmed the fixture to Natural mode.
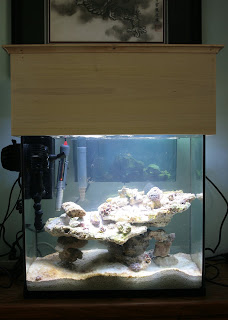
Then, I aquascaped using a minimalist approach; I used only 4 large live rocks from my main 110 gallon reef tank. Two of the largest rocks were drilled to accept an acrylic rod between them so that they could support each other with no wobbling. I tried using acrylic rods on several small pieces of live rock, but it just looked too much like Shish Kabobs to me. So, the small pieces went to the refugium for later use.
I had to pluck off dozens of green majano anemones from the rocks. And, with a lot of diligence, I plan to keep up with removing these pests until they're completely eradicated from this tank. It should be easier to access the rocks with this cube tank, but I have a feeling the Aiptasia will move in once the majanos are gone. My main tank kept sprouting majano anemones from areas I could not access, so I just gave up.
Here's a night time pic of the tank in its bare-bottom format. I'm thinking of buying some sugar grain sand to cover the bottom. Then, I'll fill it up with livestock from my main tank. I was trying to avoid the "pile of rocks" look, but it still looks like a pile of rocks! Ha! I'll be sure to separate the pieces when the sand bed gets installed.
Posted by Picasa

Thursday, May 21, 2009

Aquascaping the Nano

I had to lower the live rock platform from the top because it was exposed during a 5 gallon water change. Even though I added an AquaClear 110 on the back as a Sump/Refugium, I still had to drain some water from the Nano during a water change. So, in addition to lowering the top rock, the heater replaced with a lower wattage and Vortech moved to the left.

I'm thinking about adding another small rock to raise the top platform to separate it from the lower platform. This should make it a little more interesting. I just want to let the tank rest after the reconfiguration. With the platform lowered, there should be more room for future corals to grow to the top as well. The AC110 Sump/Refugium behind the tank is seen lit with a Coralife Mini PC.

I also added simple crown molding to the top of the canopy. Unfortunately, I selected finishing nails that were a bit too thick and really banged things up! Maybe I can use the overhanging nails to hang xmas lights during the holidays?

Posted by Picasa

Saturday, April 11, 2009

Nano Reef Aqua Sculpturing

Today, I collected about 10.9 lbs of "shelf" and 8.2 lbs of "rubble" live rock at AquaSD. I was able to go through a vat containing various sizes and shapes. At home, the rock was drilled with a 1/2" drill bit and acrylic rods were inserted to help construct the aqua sculpture. I was confined to making the structure fit into a 20 X 10" footprint. Most pieces of the live rock were easy to drill through while only a few were impossible to drill.

Here's a look at how the acrylic rods go through the shelf rocks. To hide the acrylic rods, I'll drill more small pieces and insert them between the shelf rocks. I'm aiming to get the bottom shelf drilled at an angle so that the shelf slants. In this way, I can position the sculpture to display more surface area when the tank is viewed from the front.

I was able to carry the entire structure by grabbing the bottom "legs". Of course, the rocks rearranged a bit when I placed it into the tank and it took me some time to figure out how to adjust it. I found that the shelf rocks had to be chipped away further because I wanted to leave enough room for front glass maintenance.

I originally wanted to fit the filtration device on the back glass, but there wasn't enough room. So, I mounted it on the left.

Next, I performed a 10 gallon water change on my main tank and used the discarded water to fill up the Nano tank. The biologically active water from my main tank should help speed up the process of cycling the Nano tank.

I used a filter bag with an MJ1200 pump and tubing to speed up the filtration of particulates coming off of the newly drilled live rock. Note: using the clip on the top was a bad idea because the seawater wicks up the sides and drips out. I caught it just in time, though. I then placed the temporary filter bag in the middle of the tank.

After it cleared up a bit, I turned on the Subcurrent filter device and installed a 50V heater. Left over rock was placed on the bottom left side for future use.

Sweet.

Posted by Picasa